---
title: "Sales Process Case_1"
space: "User Manual"
url: "https://docs.bcncl.com/user/manual/sales-process-case_1"
updated: "2026-06-03"
---
Sales Process Case 1 အတွက် အောက်ပါအတိုင်း ဖြစ်ပါမည်။
1. Customer
2. Sales Invoice (Cash)
3. Sales Invoice (Credit)
4. Advance Payment (Payment Entry)
5. Sales Invoice With Advance Payment (check Allocation)
6. Sales Invoice with Advance Payment (uncheck Allocation)
7. Payment Reconcilation
8. Sales Return
9. Sales Invoice or Pay to Customer cash
10. အလွတ် Return
11. Sales Invoice or Pay to Customer cash
12. General Ledger Report
13. Account Receiable Report
14. Account Receiable Summary Report
## 1. Customer
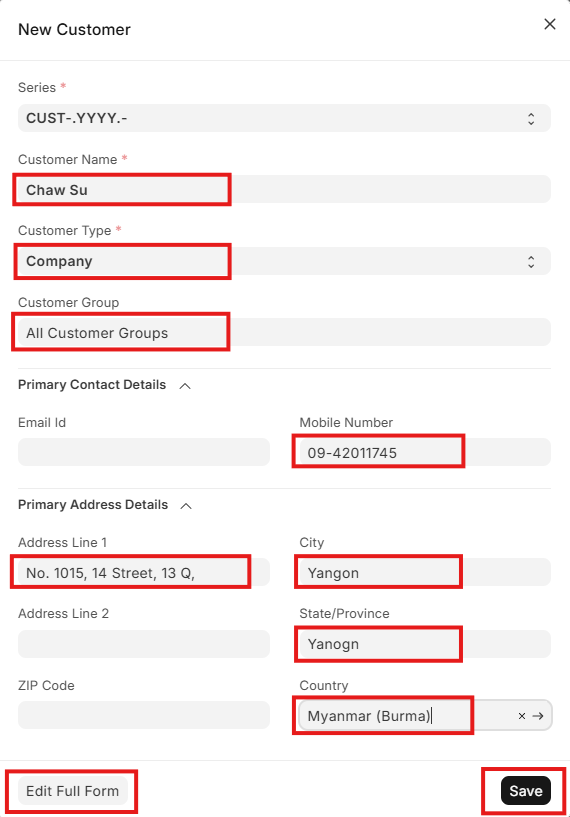
- Customer List ထဲသို့ဝင်ပါ။
- Add Customer ကိုနှိပ်ပါ။
- Customer Name တွင် ကုန်ပစ္စည်းဝယ်ယူသူ၏ အမည်ကိုရိုက်ထည့်ပါ။
- Terrotr ကို ရွေးပါ။
- Customer Type ကို ရွေးပါ။
- Customer Group ကိုရွေးပါ။
- Customer ၏ ဖုန်းနံပါတ်ကိုရိုက်ထည့်လိုပါက Primary Contact Details ကိုနှိပ်ပါ။
- Territory ကို ရွေးပါ။
- Mobile Number တွင် ဖုန်းနံပါတ်ရိုက်ထည့်ပါ။
- Customer ၏ လိပ်စာကိုရိုက်ထည့်လိုပါက Primary Address Details ကိုနှိပ်ပါ။
- Address line 1 တွင် လိပ်စာရိုက်ထည့်ပါ။
- City ကို ရိုက်ထည့်ပါ။
- State/ Province တွင် တိုင်း/ ပြည်နယ်ကိုရိုက်ထည့်ပါ။
- Country ရိုက်ထည့်ပါ။
- အခြားအချက်အလက်များရိုက်ထည့်လိုပါက Edit Full Form ကိုနှိပ်ပါ။
- လိုအပ်သောအချက်အလက်များကို ဖြည့်ပါ။
- Save ကိုနှိပ်ပါ။
## 2. Sales Invoice with Cash
- Sales Invoice List ထဲသို့ဝင်ပါ။
- Add Sales Invoice ကိုနှိပ်ပါ။
- Customer ကို ရွေးပါ။
- Sales Invoice အရောင်းဘောင်ချာဖွင့်သော ရက်စွဲကို ပြင်လိုပါက Edit Posting Date and Time ကို အမှန်ခြစ်ပါ။
- Date ကိုပြင်ပါ။
- Cash Sales ဖြစ်သည့်အတွက် Is Paid ကိုအမှန်ခြစ်ပါ။
- Due Date တွင် သည် Date နှင့် အတူတူဖြစ်ပါမည်။
- Cost Center ရွေးပါ။
- Project ရှိပါက ရွေးပါ။
- Warehouse ကိုရွေးပါ။
- Update Stock ကို အမှန်ခြစ်ပါ။
- Item တွင် ကုန်ပစ္စည်းကိုရွေးပါ။
- Qty တွင် အရေအတွက်ကိုရိုက်ထည့်ပါ။
- UOM ကိုရွေးပါ။
- Rate တွင် ဈေးနှုန်းကိုရိုက်ထည့်ပါ။
- နောက်ထပ် Item ထပ်ထည့်လိုလျှင် Add Row ကိုနှိပ်ပါ။
- Item နှင့် သက်ဆိုင်သော အချက်အလက်များကို ထည့်ပါ။
- Payment Tabe ကိုနှိပ်ပါ။
- လက်ခံရရှိသော ငွေပမာဏအား လက်ခံရရှိသော အမျိုးအစား Cash/ Kpay/ MMQR တို့ကို ရွေးပါ။
- Amoutn ရိုက်ထည့်ပါ။
- Save, Submit, Yes ကိုနှိပ်ပါ။
## 3. Sales Invoice with Credit
## 4. Sales Invoice wtih Advance Payment
## 5. Sales Invoice With Advance Payment (check Allocation)
## 6. Sales Invoice with Advance Payment (uncheck Allocation)
## 7. Payment Reconcilation
## 8. Sales Return
## 9. Sales Invoice or Pay to Customer cash
## 10. အလွတ် Return
## 11. Sales Invoice or Pay to Customer cash
## 12. General Ledger Repor
## 13. Account Receiable Report
## 14. Account Receiable Summary Report

အထက်ပါတိုင်း Massage ပြခြင်းသည် Item Price ကို သတ်မှတ်သည့်အခါ ယခင် သတ်မှတ်ထားသော Record ၏ Valid From နှင့် Valid Upto ရှိ ရက်စွဲမှာ ထပ်တူဖြစ်နေသောကြောင့် ဖြစ်ပါသည်။
ပြင်ရန်အတွက်
- Item Price List ထဲသို့ဝင်ပါ။
- ယခင် ဈေးနှုန်းသတ်မှတ်ထားသော Record ကို ရှာပါ။ တွေ့လျှင် Item Name ကိုတစ်ချက်နှိပ်ပါ။
- (…) ကိုနှိပ်၍ Duplicate ကိုနှိပ်ပါ။

- Valid From (သို့မဟုတ်) Valid Up to တွင် ဈေးနှုန်းသတ်မှတ်လိုသော ရက်စွဲကို ပြင်ပါ။
- Rate တွင် သတ်မှတ်လိုသော ဈေးနှုန်းကို ပြင်ပါ။
- Save ကိုနှိပ်ပါ။
